Instagram is great for users, as it’s a place to keep up with friends, get an inside look at the life of celebs, and get inspiration for delicious recipes, clothing, home decor—almost anything. That’s exactly why it’s also great for advertisers. Because, well, it’s where the audience is.
The possibilities on Instagram for brands and users are endless. You can run awareness ads, display your products or features for your followers, and inspire action with your brand directly from the app. The platform also has multiple built-in ways to interact directly with your brand through comments and direct messages. But one of the most powerful features for your Instagram strategy?
Instagram Stories.

Since Instagram added the Stories format back in 2016, there have been many additions and releases that have allowed users to flex their creative muscles for better branding and better engagement.
Today, I’m bringing you my six all-time-favorite Instagram Story hacks, all the way from some more basic design features to advanced and lesser-known features:
- Spend some time editing each Instagram Story
- Optimize your image for the required size
- Customize with color
- Experiment with fonts
- Try Instagram’s fun accessories
- Repost Instagram Stories
Let’s get started.
1. Get to know the editing features
This might not seem like a hack, but it’s simple: If you’re posting an Instagram Story, you should also be taking the time to make edits that make it more interesting for your audience. Period. There are so many ways you can make your images, text, and colors stand out on Stories. Now, let’s run through them!
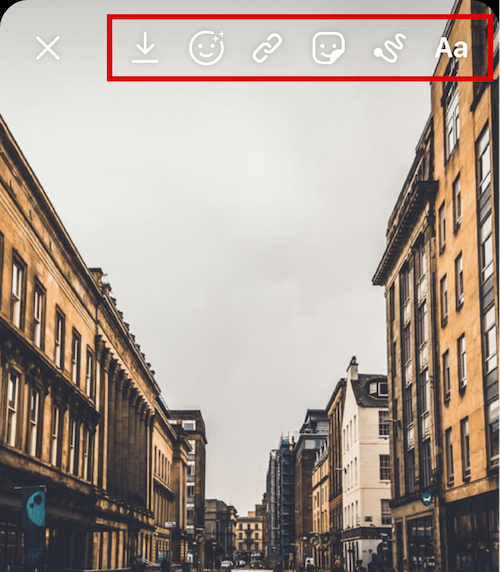
The Instagram Story editor interface. Spend some time here!
Here’s a quick rundown of the six editing icons available in the interface and how they work. From left to right:
- Save – The save icon allows you to save the image you are working on, whether it’s just the image itself or if it includes the edits you’ve made. If you’ve added in any gifs or music, it will automatically save as a video!
- Filter – The filter icon allows you to add in some of the VR filters that are available while taking the image or video after the fact – helpful if you don’t know which filter will look best!
- Linking – The linking icon in the row allows you to link something to your story, which can be helpful if you’re talking about a particular topic you’d like people to have the option to navigate to externally. Unfortunately, Instagram doesn’t allow users with lower than 10,000 followers to use this feature unless you’re linking to your own IGTV video.
- Accessories – The accessories icon allows you to add in additional engagement features and stickers, which can also be accessed by swiping up from the editor screen.
- Drawing – Next up is the drawing icon, which allows you to add in handwritten text or drawings using a couple of available brushes and erasers. You can use color selection tools from here!
- Text – Finally, the text icon allows you to add in text, also accessible by tapping anywhere on the screen.
Familiarize yourself with these tools so you can make your stories more appealing and interactive.
2. Optimize your image for the required size – 1080 x 1920 pixels
You have the option of either taking a photo directly in the Stories editor and editing from there or taking the photo on your normal camera app on your phone and importing it. A few important things to note: If you take the photo on the Stories editor and get right to editing, you’re confined to using Instagram’s presets and image editor, though the images will be in the exact size that stories require (1080px by 1920px). On the flip side, if you take the photo in the camera app, you’ll have more options for editing in other editing apps or the app that’s built into your phone. However, when you import the edited image into the Stories editor, it will need to be zoomed a bit to avoid a border on the outside. Hopefully, the photo is of high enough quality that when you upload it and zoom in, it retains its quality.
Here’s my solution: Take the photo in the Stories editor, then save it to your camera roll by tapping the download button, and edit it in an external app. That way, when you import it again, your image size is correct, and you have the creative liberty to use any editing apps you want to fit your aesthetic. A few photo editing apps I like best are Tezza, Snapseed, VSCO, Lightroom, ColorStory, and Afterlight.
If you’re looking to edit within the platform, take your photo to start. Keep in mind lighting and focal points to optimize the look of the image. Once you have the photo, swipe to the left and right to show Instagram’s 12 preset filters and choose the one you like best.

Colors available in the color bottom bar.
If you have an image you want to add that doesn’t particularly fit the 1080px by 1920px, there are a couple of solutions for making it work. Swipe up from the camera within the Stories editor, and choose the image from your camera roll. You can then pinch and stretch the image to the size you like. A lesser known option for adding photos to your Stories is to paste it in. Go to your camera roll, tap the share icon, and click copy. Then, go back to your Instagram app, take a photo of anything (it won’t show), and tap the text icon. You can then press paste and change the background color to whatever you’d like. As you are pasting the images in, you can use this method to create collages and add in multiple images to the same frame.
Pro tip: Wondering how you make the background a solid filled color? Take a photo, tap on the draw icon, choose a color, then tap and hold on the image. The entire screen will fill with that color.
3. Customize with color
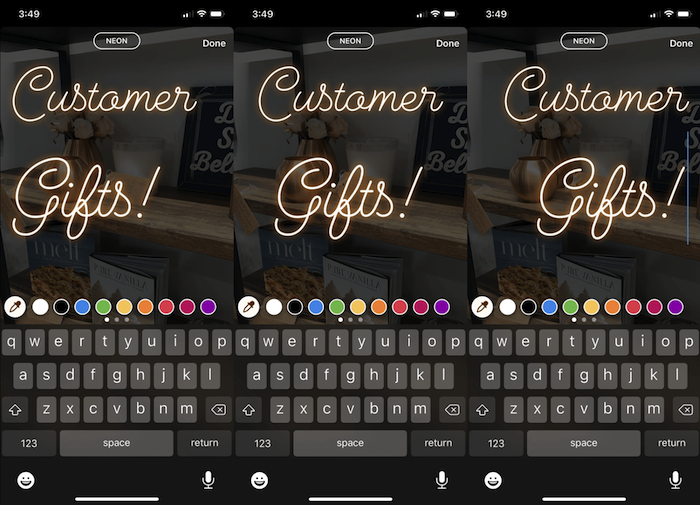
Colors can be used for many different things within the Stories: text color, brush color, background color, accent colors, and more. Just highlight the text and select the color at the bottom of the text editor.
Sick of the nine colors you can choose on the screen? Swipe the color previews to the left for two more pages of nine colors.
Still want a different color? Tap the dropper icon to select a color from anywhere in the editor. This will allow for some color synergy between the things you add-in and the image itself.
Pro tip: If you want another option outside of the colors in the image, tap and hold on the color and swipe up slightly. It’ll allow you to choose from the entire rainbow to find a color you like best.
DOUBLE pro tip: This one is tricky but creates a super cool, eye-popping effect. You can make your text a gradient of multiple colors or a select group of colors. First, write out your text in the font you’d like. Then highlight the entire text and tap one of the pre-selected color icons and swipe up slightly to the desired color. At the same time, drag one side of the selected text while you drag your finger on the desired color towards the gradient color you’d like to combine. As your selection moves across and your color changes, the gradient will appear on the screen. Try this out within certain colors, a few colors, or through the whole rainbow (just adjust how quickly you move your finger across the color selector.) To be successful in this one, it’s important to leave the last letter of the selected text selected once you finish dragging your finger across the text, or it will all go back to a solid color.

4. Experiment with different fonts and text formats
When adding text to a post, there are a few ways you can edit the text to look exactly as you want it to appear.
First and foremost, start out with an image or video. Tap anywhere on the screen to start typing. You can add as many text boxes as you’d like, just by tapping out of a text box and tapping on the screen to start another. Instagram has five fonts to choose from: Classic, Modern, Neon, Typewriter, and Strong.
If your text isn’t showing up as prominently as you’d like, tap the box with the “A” in it to add a colored background. You can choose whatever color you’d like for the background using the same color selection tips outlined above. Note that this feature is only available for the Classic, Strong, and Typewriter fonts.
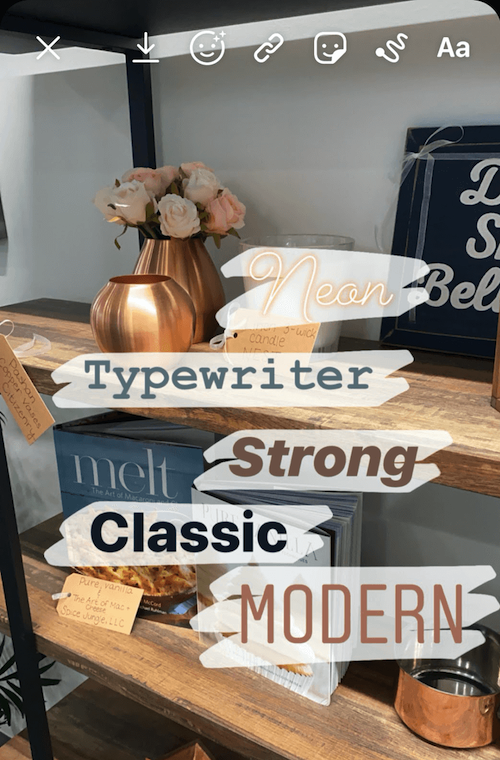
Neon, Typewriter, Strong, Classic, and Modern Instagram fonts.
When formatting the text boxes in your post, both classic and typewriter come with the ability to choose the alignment of the text, either left, right, or centered. The remaining three, however, don’t have the button available to choose your justification, they stay centered—mostly. You guessed it, here’s another pro tip: Once you type your text, lightly swipe over the text to the left or to the right to justify it that way.
Text alignments for fonts.
Additionally, you can change the amount of text that shows up on one line to better fit the aesthetic you’d like. Slide the bar on the left side of the text to zoom in and out, then pinch the text itself to resize.
Want to add an emoji? Give it a glow by selecting the “Neon” font and typing in your emoji directly from the keyboard. It’ll then have a glow behind it.
5. Try Instagram’s fun accessories
Once you choose your images, select your colors, and set up your text, Instagram has a whole host of additional features you can use to spruce up your Stories. Swipe up on the edit screen to show more options, including location, mention, hashtag, gif, music, time, polls, questions, countdown, quizzes, chat, stickers, and much more.
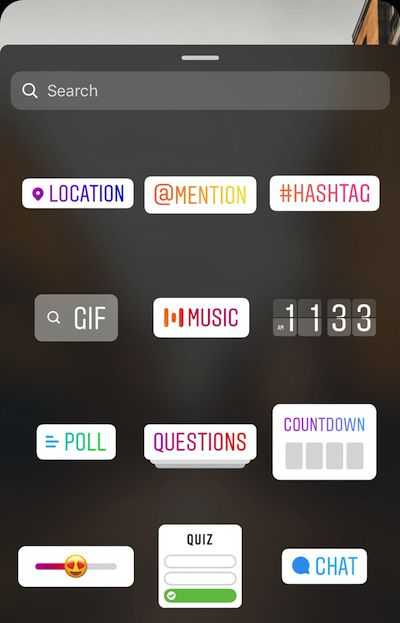
Notice the different stickers available for engagement. Swipe up to get even more!
While you have the option to add in mentions and hashtags in the Stories format, you’re not confined to this option. You can also add mentions and hashtags in the same way you add text, and format them accordingly.
Questions, polls, and quizzes can be valuable tools for driving engagement through your Stories and a really great way to interact directly with your followers. Try out each format with different content to see what resonates best.
Through Instagram’s integration with Spotify, you can use music in a couple of ways. Each way plays the music over the top of your stories, but there are a few options for how the player itself presents. You can have a small player with the album cover, the name of the song and artist, or the lyrics. The player also allows you to choose the part of the song you’d like to play, so play around with which part of the song makes the most sense with the content you’re sharing.
Pro tip: Try out a progression post by adding some of these features as you go. I get asked a lot about Stories that start out with one or two elements then add more in as you tap through. This is a cool effect to emphasize different aspects of the story, and generally promote more engagement as viewers will spend more time interacting with your story if you make it longer. To achieve this style, start out with your base and intro the topic you’ll be posting about. Then, as you finish each step, tap the save icon on the top of the screen. Once you post and go to start your next post, upload the image you just saved and keep going. Once you’re done, you’ll have a full progression post!
6. Repost Instagram Stories
You can easily repost Feed posts from other accounts you follow as long as they’re public. Underneath the photo you’d like to share, tap the send icon (the third icon in) and select “Add post to your story” from the top of the list. This will bring the post into the Stories editor, where you can edit, add text or graphics, draw images, or add in a hashtag or location. Additionally, if you tap the post from the editor, it’ll change the post type to more resemble how it looks in the feed, with the account name on top, their icon, the post, and the caption underneath.
This can also be used to show those who may be more active on Stories to see what you post to your Instagram feed. You can share your own posts to your story to bring traffic to your feed post itself. A popular strategy is to do a giveaway on the post, requiring people to go back to your feed to enter, or to cover the image with a sticker or gif so followers must navigate to the post to reveal it. Just remember, you can only share a feed post to your story if the account that shared the original post is public!
Go and use these Instagram Story hacks!
There you have it! With these Instagram Story hacks, you’ll be able to make your organic Instagram Stories stand out against others. Get creative and try combining different aspects, and always remember to try to engage with your audience as much as you can!
If you liked 6 Epic Instagram Story Hacks You’ll Wish You Knew Sooner by Mikayla Wyman Then you'll love Miami SEO Expert